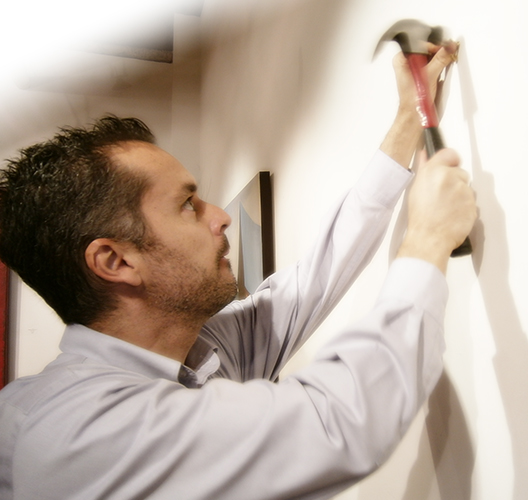
You’ve just purchased a spectacular painting. An artist spent years studying, refining his/her craft to create this masterpiece. A gallery went to great effort and expense to display the work so that you could see it in a pristine setting. Now, you’ve got the work home and . . . you’re on your own.
Many collectors feel overwhelmed by the prospect of hanging new artwork. They worry that they won’t know where best to display the work in their home, or that they’ll make a mistake in hanging the work, and it won’t look as good in their home as it did in the gallery, or that it won’t fit in with the other work in their collection. In this guide, I’m going to help you alleviate any of those feelings and give you tips that will help you hang artwork like a pro.
Before I begin, allow me to give a little of my background. I’ve been surrounded by art since I was a young child. My father, John Horejs, has been a professional oil painter for most of my life. I grew up watching him create artwork. Our home was always filled to overflowing with paintings. Though I never wanted to become an artist, I, too, fell in love with art and followed him into the art world. I began working in an art gallery when I was 17 and have done so ever since. I opened my own gallery, Xanadu, in Scottsdale, AZ in 2001.
It’s safe to say, over my lifetime, I have hung thousands of paintings. I’ve rehung the artwork in my gallery countless times, often on a weekly basis. I’ve hung artwork for my clients in their homes – many here in Arizona, but as far away as Boston! If you can imagine a difficult scenario for hanging a painting, I’ve likely encountered it.
Over the years, I’ve learned a lot about hanging artwork successfully. I have learned from experts in my industry, but even more through experience. I would like to share some tips and techniques I use that will make hanging artwork much simpler.
The most important thing you should know about hanging art, in spite of the fact I’m going to give you some formulas and equations, is that hanging a painting is not an exact science. You should also know that there is no objective right or wrong way to hang a painting. The most important thing is to hang the art in a way that feels right to you. The guidance I’m going to give you here will allow you to find what feels right more quickly.
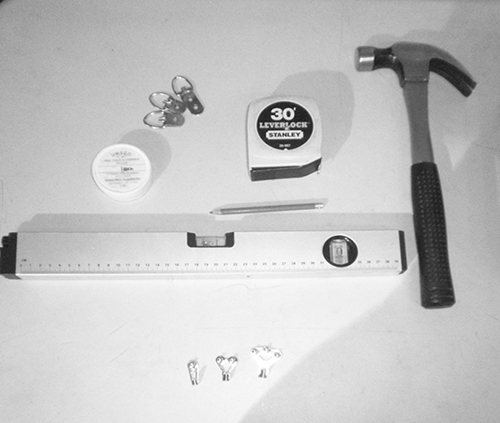
Any job is easier with the right tools. Investing in the right tools will not only make the job easier, it will ensure better results. Fortunately, it’s easy to obtain tools to hang artwork, and the investment required is a small one.
The first four tools are pretty straightforward and can be picked up at any hardware supply or home improvement store.
Hammer
When it comes to hanging a painting, just about any hammer will do the job. Some prefer to use a small framer’s hammer, as it is less likely to bend your nails. I prefer a traditional claw hammer that has some weight to it. With practice, you won’t be bending the nails anyway, and the weight helps you drive the nails in more quickly. An occasional bent nail is a minor inconvenience and worth the trade-off to have the driving power of a full size hammer.
Tape Measure
A good tape measure is also invaluable. It’s unlikely you’ll be hanging a piece of artwork at extreme heights or need to measure extremely wide walls, so a 12 or 15 ft tape should be more than adequate. Cheap tape measures will bend and jam – spend a few extra dollars and get a sturdy one.
Level
Some people can sense how level a painting is by pure instinct; I’m not one of them, and I, therefore, like to have a level handy at all times. Invented in the 15th century by Melchisedech Thevenot in France, the level has to be on of the greatest inventions of the last millenium. Utterly simple but infinitely useful.
Several years ago, I purchase a laser level. The laser creates a line that extends the length of the level, and it makes you feel high-tech. Truthfully though, I’ve found I very rarely end up using the laser function. My batteries died in the level several years ago, and I’ve yet to replace them. In other words, an old fashioned, low-tech level should meet all your needs
Pencil
Any pencil will do for marking your wall. I use a simple number 2 lead. It’s easy to erase if you make a mistake. This is a job where you don’t necessarily need a sharp writing tool, but it doesn’t hurt to have a good sharpener around, just in case.
The next four tools are specialized hanging tools. You’ll probably have to order them online if you don’t have a specialty art supply or framing supply close by. I include links to the suppliers I use, for your convenience.
Floreat™ Hangers
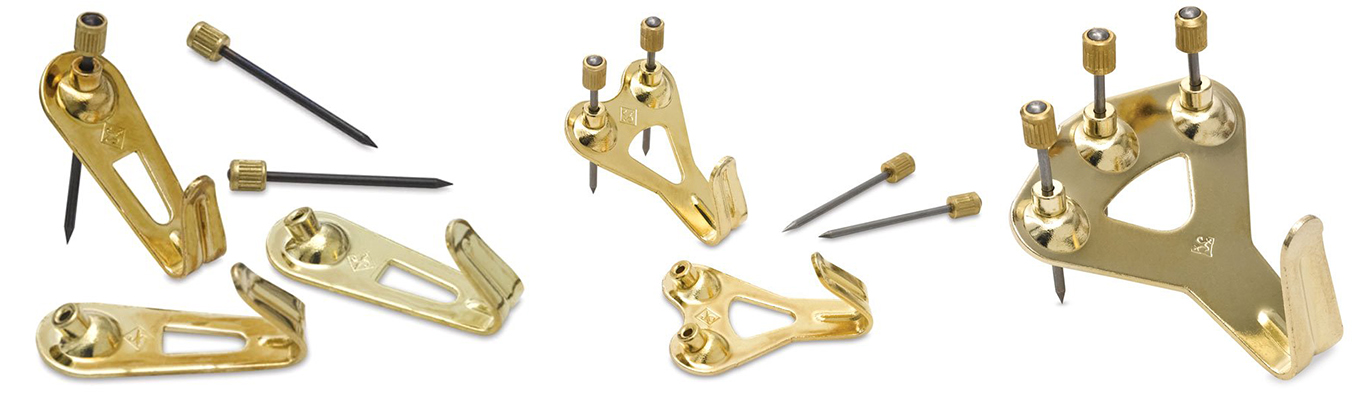
Painting hooks are available at most hardware and home improvement stores. The variety they carry is okay, but once you’ve used a Floreat hanger, you’ll never be able to use another brand again. Floreat hangers are manufactured in Germany, and the engineering and design are exceptional. These brass-plated steel picture hangers are strong and durable. The nails are extremely tough, yet very narrow, almost pin-like in gauge. They leave very small holes in your wall. Unlike other brands, Floreat hanger nails won’t bend easily and can be reused if you need to move the artwork.
The hangers come in 10, 20, 30, 50, and 75 lb rating varieties. I typically have the 20, 50 and 75 lb hangers in my toolkit. The hooks can be doubled or combined to take higher weights (more on heavy pieces later).
I order the hangers online from Ziabicki Import Co., and if you order one box of the 50 lb hangers, you should have enough to last you for many years.
https://www.ziabicki.com/deluxe–floreat–hangers
Strap Hangers
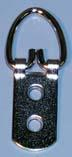
Most paintings that you purchase will come wired on the back, ready to hang. However, it’s always a good idea to verify that the hardware the artist or gallery provided is sturdy and well mounted. Recently, a rather large painting in my own home came crashing down. In spite of the fact I had used the right hanging hooks, the picture wire on the back of the piece pulled the mounting hanger out of the frame, and down the piece came. We were fortunate that the damage was only minor, and even more fortunate that it happened in my own home, not the home of a client. But I learned a valuable lesson about the importance of every component in the hanging process.
When hanging small, light pieces, the hanger isn’t as critical, and often a simple screw-eye hook will be more than sufficient. As work gets heavier, however, it’s important to have a sturdy hanger in place.
I use heavy, two hole strap hangers from United Manufacturer’s Supplies. Several other designs and weights are available, but this one is well-engineered and will work for almost any scenario.
http://www.unitedmfrs.com/cart/detail.cfm?item=709
Tuflon™ Coated Picture Wire
United Manufacturer’s Supply also has a great picture wire. Their Tuflon coated wire is heavy, and the coating prevents the wire from fraying and splitting, which can lead to catastrophic failure.
You can get a roll of the #6 wire for around $20 at the time of this writing, and the roll should meet all your hanging needs for many years to come.
http://www.unitedmfrs.com/cart/detail.cfm?item=5746
Nail Hole and Corner Filler – Gold, Dark Gold, & Silver
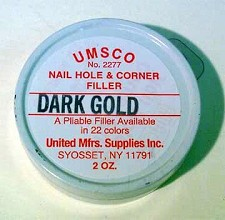
Finally, whenever you’re hanging a piece of artwork, it is almost a certainty that you are going to ding up the frame (hopefully only minor dings). Rustic frames can take a bit of abuse, but a more ornate frame is very sensitive to any scuffs or scratches. Every precaution should be taken to avoid damaging the frame, but if damage does occur, it’s a good idea to have a way to cover nicks and scratches. Once again, United Mfrs Supply has just the right tool. Their nail hole and corner filler comes in a wide variety of colors and finishes and is designed to be applied to a wood frame to cover any blemishes. Even though the color won’t be an exact match, it will be close enough to make the imperfection disappear.
The filler is a colored putty that is guaranteed not to dry out or crack. To apply, you will get a small amount on the tip of your finger and smudge it lightly onto the frame, blending it into the surface and filling any holes or gouges.
Of course, large cracks or gashes may require the services of a professional framer.
http://www.unitedmfrs.com/cart/detail.cfm?item=2277
Drywall Anchors

Some artwork, especially contemporary pieces, may not be presented in a traditional frame, or the mounting may not work with wire and hooks. In those cases, or if the piece is heavier than about 120 lbs, you may need a heavy-duty drywall anchor in order to mount the piece. A number of different types are available. I prefer the expanding metal screws that are driven into the wall with a hammer and then screwed in to expand a kind of flange behind the drywall.
Plastic drywall anchors and metal drywall screw mounts are also available, but I haven’t found these to be as stable as the expanding screws. Follow any instructions carefully, and ask your hardware store for advice about which mounting is appropriate for your application and how to do the installation.
Mortar/Concrete Anchors

As I mentioned in the introduction, I’ve had the occasion to hang artwork in some fairly awkward locations. Some of the most difficult hangings have been above fireplaces that have stone or block mantles. My first word of advice in this kind of situation is to get professional installation help. These installations can be very tricky, and a professional will have the experience and tools requisite to handle almost any scenario.
If you do choose to mount the artwork yourself on a surface other than drywall, you will likely need to use mortar or concrete anchors. Again, your local hardware store can be a great resource for finding the right anchor for your installation.
A few simple preparatory steps will make the actual hanging easier.
Clear the Wall and Your Work Space
Rather than moving your couch out of your way, it may seem easier to climb onto it to hammer in the hook and hang the painting; you can trust me, it isn’t. If at all possible, I advise you to clear everything off the wall and move any furniture out of your way. This includes lamps, plants and other pictures. Give yourself the best possible access to the hanging space to avoid damage to artwork and furniture.
Clearing your space is especially important if the piece is heavy and requires more than one person to hang it.
Determine the Wall Composition
In the first section, I provided you with a variety of wall hanging hooks and anchors. It’s important to select the right one based on the material composition of the wall. Most walls are built of drywall these days, and drywall is the easiest material to work with. I’ve hung artwork on plaster, block, and wood walls, all of which require screws, and often anchors, instead of simple hooks.
Because most homes are drywall, and because plaster and block walls often require a custom installation process, I’m limiting the instructions in this guide to drywall installation. Other materials almost always require a professional installation. Better to bring in a professional than to have to hire one to do a repair on damaged artwork!
Take Initial Measurements to Determine Approximate Placement of the Artwork
I will give exact measurement guidelines for measuring and placing artwork in the next section, but for now, you want to have a rough idea of artwork placement. If you have a good idea of your approximate placement, determining the final placement will be much simpler.
Each installation will be different, based on the design requirements of the room, your personal taste, and the individual piece’s composition and scale.
As a rule, you can start by centering and then refine the placement from there. A large piece will typically be roughly centered on a wall, or, if the wall is divided visually by some other element (a piece of furniture, a column, etc.), you might center the work in the visual space. If the artwork will hang above a couch, you will typically hang the piece to center on the couch.
Again, this is only a place to start. Sometimes, you will need to work to create balance on a wall, offsetting other artwork or other visual elements.
Entire courses exist in design school on how to place artwork and furniture, but typically, if you follow your instincts, you will place the work almost perfectly. You are going to be living with the artwork; your satisfaction is what counts most.
If the artwork is a particularly important piece, have your designer help you place it, or ask an artist or gallerist to help you place the piece. I’m happy to offer placement consultation (at no charge). If you live in the greater Phoenix area, just give me a call and I will come by and help you hang the artwork. If you live outside of Phoenix, email me an image of your new artwork and of the space you are considering for the piece, and I can help you with placement over the internet.
Check the Wire, Straps, and Picture Hooks
I mentioned the importance of checking your hardware in the previous section, but it bears repeating here. Before you start hanging, check and then recheck all of the hardware to make sure everything is solid.
Pick the painting up by the picture wire and lower it and raise it in your hands a few times, as if you were lifting weights. Do this carefully, and make sure you do it over a soft surface – carpet, for example, or a blanket. Raising and lowering the artwork puts a small additional stress on the hanging wire. If I hear any creaking or feel any give in the wire, I replace the hanging straps and wire without hesitation. Remember, the piece may be hanging on this wall for years and years to come. Better to spend a few extra minutes now to make sure the hardware is secure than to have problems in the future.
Now that you are prepared and have all of your tools, it’s time to get this picture hung. You’ve already determined roughly where you are going to place the center of the artwork. Now it’s time to determine height. Determining the right height for the artwork is critical – it can also be a bit tricky. I’m going to give you some tips that will help.
Height
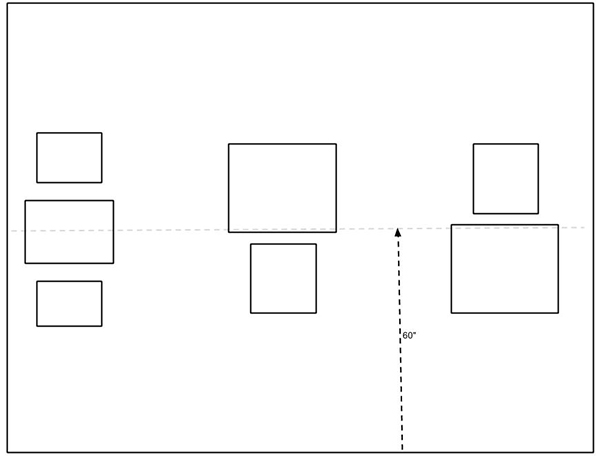
Two main factors will be taken into consideration as we prepare to hang the artwork. First, will the artwork hang above some other object, such as a table, sofa or other item of furniture? Second, what is the height of other objects displayed on the wall in the room?
The goal in hanging the artwork is to create harmony throughout your space. Creating a common height will help. I strive to align the centers of all of the artwork in a room to achieve the common height.
So, our first decision is to determine what the center height of the artwork should be – in other words, how high off the floor will you place the center of your artwork? Eye level would be the perfect height, and if you live alone and will be the only one viewing the art, by all means, measure the height of your eyes and use that as your guide!
Most of us don’t live alone, however, and unless everyone in your household is exactly the same height, you’re going to have to compromise. I feel that 60” is a good middle ground. I’ve found that five feet from the floor is close enough to eye level that the height won’t offend either the very tall or very short, and to most viewers it will feel perfect. You may decide you want to hang a little higher or lower to have the height feel right, and this is fine. Just be sure to use the same number to calculate the height of all of your art.
Getting the center heights aligned is easy if you have a blank wall with no furniture, so let’s begin there, and then we’ll throw some furniture into the mix to show you how to deal with it.
On an empty wall, we’ll measure the height of the painting, divide that number by two, add the number to our ideal height (60”, or whatever height you decide your ideal height is) and then subtract the distance between the top of the artwork and the highest point of the picture wire. The resulting number is where you will place your hook.
Wow, that looks really complicated written out as it is here, but the formula is pretty simple once you get the hang of it (pun intended). Working your way backward, you’ll see that in order to get the middle of the painting to align with your ideal middle height, you’re going to have to determine how much higher the wire is than the middle of the painting. My formula does exactly that.
Written mathematically, the formula looks like this:
1/2p + i – w = h
where p is the height of the picture, i is your ideal height, and w is the distance between the top of the frame and the highest point on the picture wire.
Alright, that didn’t really help simplify things either. Let’s try an example and illustration and see if it makes the process easier to understand.
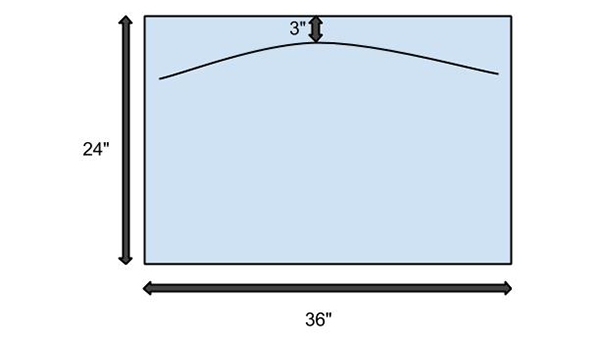
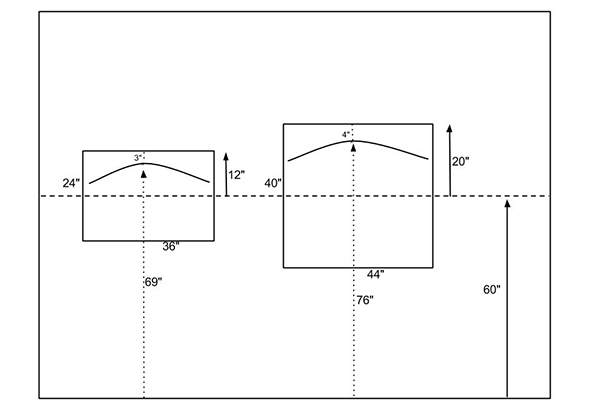
Let’s say your new artwork measures 24” high x 36” wide and that the wire is 3 inches from the top of the frame. To get our hook height, we would take the height of the painting, 24”, divide it by two to get 12” (in other words, 12” is the vertical middle of the painting, which we want to align to our ideal middle height). We would then add that number to our ideal height, 60”, to get 72”. This is where the top of our painting will be on the wall. Now all we have to do is subtract the wire distance, 3”, to get 69”, which is the height we need to place the hanger. Easy! Now you can measure 69” up from the floor, make a pencil mark on the wall, and pound in your hook.
If we were to now hang another piece of artwork on the same wall, we would see how this formula forces the alignment of the artwork. If the second piece of artwork were 40” high x 44” wide, with a wire that came to 4” inches below the top of the frame, our calculation would be:
Dividing the height of the painting, 40”, by 2, we get 20”. Add that to 60”, the height where we want the middle of the painting, to get 80”, the height of the top of the frame on the wall. Subtract 4” to get the top of the wire at 76”.
Use our Online Painting Height Calculator
Now that I’ve explained the process, I’ll give you a simple way to cheat: use our online painting height calculator at http://www.xanadugallery.com/Height–Calculator.
Extremely Tall Pieces
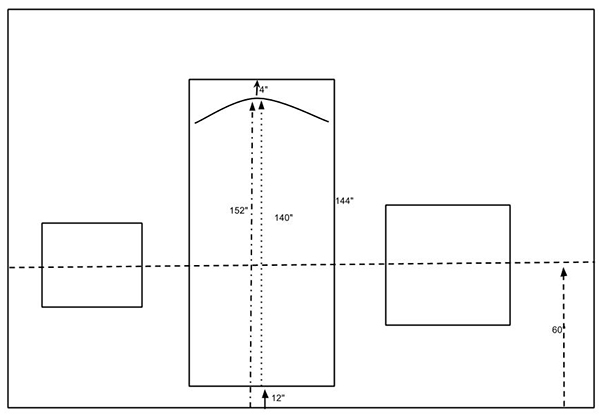
My formula works extremely well for artwork of any height up to 120”. Once you get to 120” you run into the floor (if you are using my 60” middle height). With tall pieces, I prefer not to hang right on the floor, but rather up 8”-12”, depending on the size of the piece.
Measuring for our hook on a tall piece is actually pretty easy. We’ll measure from the bottom of the piece to the top of our hanging wire, and add that number to 12” to get the height of our hook.
Hanging Groupings
Now let’s say you purchased two smaller pieces and you intend to hang them together, one above the other on the wall. Well that’s just great, you had to go and throw another curve at me, didn’t you!?
Hanging groupings is actually no harder than hanging a single piece, and in fact, I consider any grouping to be a single piece. Any measurements will be taken from the overall grouping, not the individual pieces.
For smaller pieces, I usually allow about 4” between the paintings. I carefully lay the artwork on a table or on the floor, measure the total height of the two pieces, including the space between them, and then run our calculation. The resulting number will be the height of the hook for the top painting. Go ahead and hang the top piece.
Now measure the distance between the wire and the top of the second piece. Add four to that number, and then measure down from the bottom of the first piece by that amount. This will give you the hook location for the second piece. You may have to take the first piece off the wall once you have the height of the hook so that you can place the second hook directly below the first (a level comes in handy for this job).
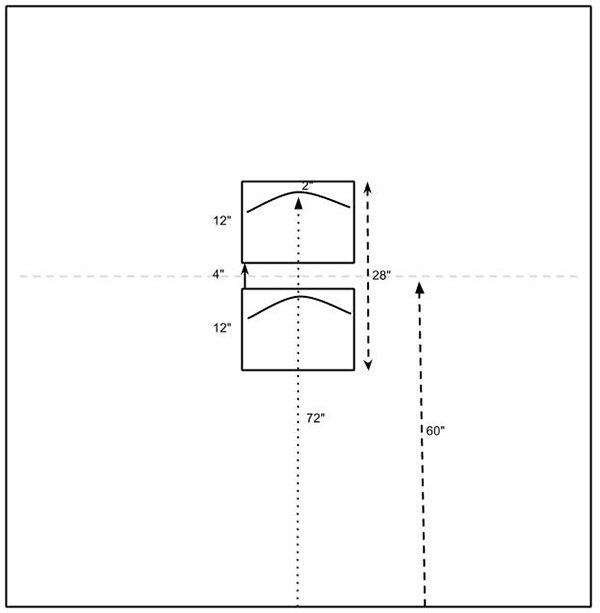
In our example, we used paintings similar in size. If the paintings are of different sizes, the middle height might not be right in between the pieces as it is in the illustration. That’s okay, you just want the mid-line to be in the middle of the grouping.
If the pieces are different sizes you will also have to decide whether you want the larger piece on top or underneath. There’s a great debate on this subject. Some insist that the larger should always be on the bottom, others say it should be on top. I’ve hung both ways and recommend you do what feels most natural to you.
If you have more than two pieces, you will use the exact same technique of creating a grouping and using the grouping to make your measurement calculations.
Furniture
Thus far we’ve been hanging on a blank wall, not dealing with furniture. What if we have a sofa or table that will sit under the artwork? If the furniture isn’t in conflict with the artwork using the methods above, I would basically ignore the furniture and hang the artwork using our middle-line method. As long as you have sufficient space between the furniture and the artwork, this will look best. If the furniture, or artwork, is too tall to allow for this, do the same thing we did with tall artwork: create a space (I like 8”-12” inches) and measure up to the wire.

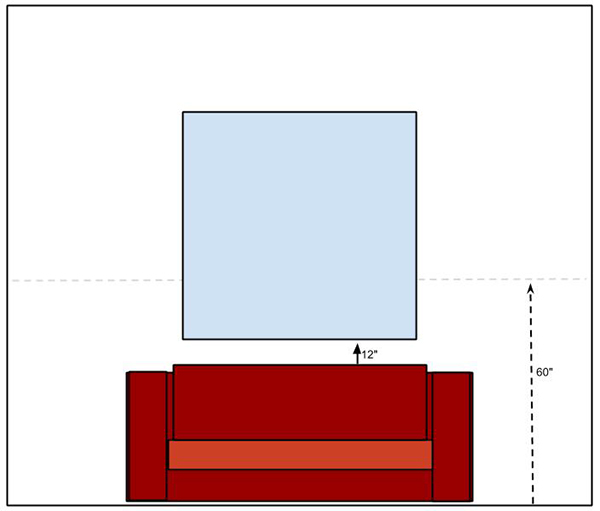
You may use the same approach to hang a painting over a mantle or in a niche – measure up from the desired bottom of the installation.
Using Multiple Hooks
If a piece is heavy, or if you want to help prevent the artwork from shifting off level, you can use more than one hook to hang it. All of the measurements and formulas remain the same, but instead of placing one hook or screw on the wall, you will use two or more, separated by 4”-5”.
Using multiple hooks help distribute the weight. If the wire is on two hooks it becomes much more difficult for the painting to shift and become crooked due to vibrations or bumps.
Alternate Method: Trial and Error
If all the math and formulas seems like too much effort, you can always use the trial and error method. Hold the piece up on the wall at a height that feels right to you, estimate where the hook would need to be in order to get you to that height and pound in a hook. Step back and look at the piece. You can measure the height of the middle of the piece from the floor, and if you are off significantly from where you would like to be, take the painting down and move your hook accordingly.
This method usually only requires moving the piece one or two times to get it right. You would be surprised how many gallery owners, artists, and other art professionals use this method. With the Floreat™ hangers, your nail holes are so small that they are almost inconsequential. You won’t feel that you are destroying the wall if you have to move the hook a few times.
Protecting the Artwork
Gloves
Artwork is delicate. When you are handling the artwork it’s a good idea to avoid fingerprints and smudges. Consider wearing white cotton gloves while handling your artwork. The gloves will prevent damage to the surface of the artwork and they’ll make you feel like you have your own personal museum!
Padding
You may also place a folded blanket on the floor under the artwork as you are hanging it in order to protect the work from potential damage. This will give you a soft surface on which to let the artwork rest; it will also act as a shock absorber and cushion if your newly acquired hanging skills fail you and the piece falls off the wall.
Work with an Assistant
If the artwork is heavy or fragile, it’s always advisable to have a second set of hands. Besides helping lift the painting, an assistant can help support the artwork as you place the wire over the hook, always a difficult task.
Getting the Wire on the Hook
If the piece is particularly large and the wire on the back of the frame is tight, it can be difficult to get the wire over the hook by reaching behind the piece. We have an old wood yardstick with a notch cut in one end that we use to reach behind the art and raise the wire over the hook.
Make Sure the Wire is Firmly Set in the Hook
Once you’ve hung the piece on the hook, don’t immediately step away from the artwork. Pull your hands slowly away from the artwork, keeping them poised to catch the piece if the wire didn’t firmly set in the hook, or if the hook isn’t firmly in the wall. You can also pull the artwork away from the wall and glance behind to see that the wire is indeed in the hook and not resting on the nails.
Never, Never, Never
Never Use Adhesive to Hang Artwork
Never try to use adhesive to mount the artwork. I’ve seen artists attempt to hang artwork using plastic hooks and industrial adhesive. I suppose some of them may have been lucky and had success with this technique for very light artwork. This kind of luck doesn’t hold out, however. Eventually the artwork is going to fall. I have no doubt that some adhesives are strong enough to take the weight of artwork. The problem, however, is the surface you are trying to adhere to. If you glue a hook to a painted wall, you are, in essence, placing all of the weight of the artwork on the paint. The paint will eventually peel away from the wall and your artwork will end up on the floor.
Don’t Worry about Holes in the Wall
Better to make a few extra holes in the wall to get the placement just right than have the piece hung incorrectly. Holes are easily patched and painted over.
Never Use Defective Hanging Hardware
Throw away bent nails and hooks. Trying to use damaged hardware will only lead to frustration, bruised thumbs, and damaged artwork.
Hanging artwork can be a lot of fun. If you follow the steps I’ve shared in this guide, there’s no reason you can’t become an expert art hanger and the curator of your collection.
We have a client for whom we hung a few pieces several years ago. When he saw how easy it was, he said, “I can do that!” He later told us that on many Friday evenings he will have a few margaritas, and he and his wife will completely rearrange their collection.
If you do ever run into difficulty with the hanging, don’t hesitate to contact a professional art installer, a gallery, or Xanadu in Scottsdale. No hanging challenge is insurmountable.
Enjoy your new artwork!
While this blog post is geared toward collectors, there are a number of ways that artists and galleries might use our How to Hang a Painting guide.
- The ideas shared in this article apply to artists hanging their work for shows or display in galleries (or in your own home, for that matter).
- Print a copy of this guide from our pdf page and give it to a collector who has just bought one of your pieces. You may freely print and distribute the pdf as long as you don’t alter it. Be sure and attach your business card to the print out.
- Email a link to the pdf version of the guide to your collector list. Your collectors will appreciate the information in the guide, and they’ll appreciate the effort you went to to forward it to them. Be sure and include a link to your website in the email – you’ve just given your collectors a great excuse to think of you and your art.
- Post a link to the pdf download page or this page on your website or blog and on your social media pages to provide this resource to your followers. You also have my permission to download the pdf and post it directly on your site or email it to your mailing list as long as you don’t alter it in any way.
Do you have additional tips or ideas about what you’ve read in this post? Do you agree or disagree with something that was said here? Did you find the information valuable? Let us know! Make your voice heard by posting a comment below. Please note that because of the comment spammers, we have to review all comments. It sometimes takes a few hours for your comment to appear. We truly appreciate your feedback – it makes the posts even more valuable!